Today we played the above action described in Wednesday's post. Robbie took the Confederates while John and I had the more numerous Union forces. Three pretty crack and ably led brigades of Confederate infantry and a brigade of cavalry were defending against four brigades of Union infantry, only two of which were anywhere near decent, and a brigade of cavalry. The Confederates started the game with their cavalry deployed by the barn in the above photo and one brigade of infantry in the top right (south east) corner. Their other brigades would enter later in the game down other of two roads on the left (Eastern) edge of the board. We had to throw to see where the Union forces appeared and it couldn't have been much worse. The cavalry and the artillery battalion of four batteries started on the Stanhope Turnpike on the northern (bottom) edge, while all four of their (our) infantry brigades entered in succession along the road in the centre of the eastern (right) table edge. Obviously someone had not told the brigade commanders what the axis of their advance was to be nor the order of march!


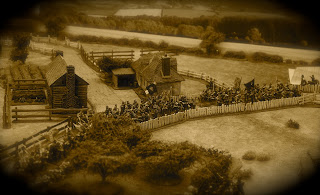


Union cavalry moving down the turnpike.

One regiment dismounts while the other pushes into the light woods on either side of the road.

Robbie's Confederate cavalry beyond the woods.

The first Union infantry brigade enters the battlefield and makes a dash for the fence line and sunken road in the centre of the table.

Confederates push forward along the turnpike to head off the Union thrust for the centre.

Back at the pass, the Confederate cavalry have rushed forward and dismounted to counter the Union horsemen trying to advance through the wooded slopes of Scutterhill Gap.

The second Union brigade arrives and moves off to the left to try and link up with their cavalry and divisional artillery battalion.

Meanwhile, the Confederate cavalry have halted the Union horsemen in the woods pouring a withering fire onto them and the third regiment has charged the Union skirmish line while their horse battery deploys on the road in support.

The Union cavalry are swiftly and ignominiously bundled back into the pass and off the table, leaving the divisional artillery battalion exposed without any supports. A VERY bad start for the Union forces and their thrust into the Durham Valley.

Confederate infantry beat the enemy to the road and line the fence line and sunken road.

Union troops forging forward to cover the army's left flank and to try and save the now isolated artillery battalion.

Looking south down the turnpike with the opposing forces closing and trading musket fire.

Confederate reinforcements rushing to cover the centre their position by the crossroads.

More Confederate reserves move up into position behind their troops in the road.

Union troops on their left making slow progress against a largely open Confederate flank.

Two batteries of the isolated artillery battalion are caught and swept away by yelling rebel horsemen. I had nine dice to throw for closing fire, needing 4+ to hit and I missed with every single one!!!!!!

Union troops cross the river.

Confederates mass at Stanhope Tavern. The Union troops are unable to dislodge them from their position.

At last the Union brigade on the left starts to advance, driving back the Confederate sharpshooters to their front.

In the centre the Confederates charge John's infantry. John fails to score a single hit as they charge in and drive him back! The dice Gods are not favouring the men in blue today.

The Confederate cavalry catch the last two batteries of Unions artillery but are driven off and destroyed. The Confederate C-in-C was shot from his horse and severely wounded as he led his men in probably one charge too many.

The Union centre is weakening under pressure from the tough fighting Rebs!

On the Union right, things are going badly. Very badly. Whole regiments have crumbled or been swept away in the face of some tough and very stubborn Confederate infantry.

In the centre the extent of the trouble the Union forces are in can be seen with the Confederates surging through the first line of boys in blue. The zouaves at the bottom of the photo are in danger of being isolated from the rest of their army.

Behind the Confederate centre.

The sunken road.

The now open Union right, devoid of troops. At the moment of victory the Confederate brigadier is killed leading his mean forward.

Union troops in the centre holding the orchard.

On the left, the Confederate cavalry are about to be seen off at last and the Union troops begin to swing round to face the Confederate centre. Sadly, with their right broken and the centre about to buckle the Union commander decides to halt his attack and pull back in retreat after a shameful performance by his men.
Well then. It was a great game and the supplement works really well with a few very useful and to me realistic rule adaptions. I'd not played Black Powder for quite a while but it was easy to get back into the rules. I had thought the sides were reasonably balanced, with superior numbers of Union troops facing fewer but much better tougher and harder fighting Confederates. Great idea....not. I based the Confederates on formations in the supplement, so they got the equivalent of a Texas brigade, the Stonewall brigade and Picket's brigade. The Union troops had the Iron brigade, the 'Irish' brigade, a bog standard brigade and the infamous 'Flying Dutchmen'. Our unfortunate and quite honestly crappy deployment meant that we lost our cavalry very quickly and our superiority in artillery was immediately negated by it coming on in the wrong place. Had it been supported by some infantry things may have been more positive but we shall never know. What can be said is that with John and I throwing incredibly bad dice (John especially by his own admission) and Robbie throwing the complete opposite and saving almost everything the game was only going to go one way. Nevertheless it was an excellent day and I am looking forward to next time.
So, the first Union foray into the Durham Valley has been repulsed quite bloodily. The biggest loss to the Confederates was among their commanders, with one brigadier killed and the C-in-C critically wounded. Will he survive? We shall see but next time the Union forces will have to do much better as they still need to press on down the Stanhope Turnpike in order to get to the railhead at Auckland Junction. New dice please!
Oh, I shall put some colour photos of the game up later, but I thought I would just use 'period looking' sepia tone for this post.
Oh, I shall put some colour photos of the game up later, but I thought I would just use 'period looking' sepia tone for this post.
A Union Disaster! Send for reinforcements! Lovely pictures,Colin,very evocative of the period I think. Great AAR though I feel your pain at the outcome. I suggest a significant sacrifice to the Old God of Dice...
ReplyDelete