If you remember the scene setting in the previous post here the combined French and Spanish armies were attempting to defeat the Austrians and their (fictional) Waldensian allies in order to use the pass at the eastern end of the table to invade the County of Waldensia. The year is 1732 so by some happy coincidence the armies of the major powers are actually at war fighting over the Polish succession. I used my existing 18thC armies for this game, as I have sizeable French, Spanish and Austrian forces in my collection. For the fictional Waldensians I used my WAS/SYW Duchy of Modena army. They've never been in action before, and I mean, does anyone else own a Modena army of this era? The game was also the inaugural outing for my French and Spanish, so great things were expected of them. Or not.
Conrad and John were the two commanders in chief, and I'd sent them their OoB and photos of the tabletop a couple of days before the game so they could advise me as to their troop deployment. Both commanders effectively refused their left flanks. Conrad and Shaun were the Austrians,with Neil as the Waldensian commander, while Paul, John and Mark were the Franco-Spanish forces. We used Honours of War for almost the first time in several years instead of Black Powder, which as it turned out was a good move as it produced a much tighter and more nuanced and intuitive game than BP would have.
As is now ‘normal’ the game was played remotely, with three cameras live streaming the table from different angles while Skype was used for the audio. The players could each chose the camera view best for them. All I had to do was move the figures as directed and resolve combat and morale.
 |
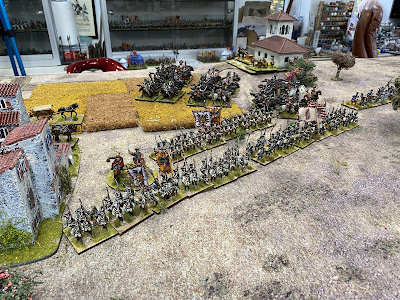
The battlefield as seen from the western end, with the Spanish and French on the left.
|
 |
The large French brigade in the centre began their advance towards the enemy.
|
 |
The Austrian left edged forward, four battalions of infantry (one in the village) with six regiments of cuirassiers and dragoons in their rear.
|
 |
| The Spanish advanced, but more slowly than the French as Paul failed to get them moving at the beginning of the game. With the exception of the Irish and Swiss battalions they were classed as inferior. |
 |
The Austrians had a regiment of hussars and another of Grenzer facing the Spanish. These fell back in the face of the Spanish advance.
|
 |
Neil's Waldensians, all classed as inferior troops, but led by a 'dashing' general!
|
 |
A view of the French infantry and cavalry as they began their attack. The cavalry were under fire from Austrian cannon at the bridge but stood taking a slowly rising number of casualties.
|
 |
The front line of the Waldensian brigade were to start loosing heavily to French artillery.
|
 |
The Austrians ready to withstand the French and Spanish attack.
|
 |
| To the East of the village the French (Irish) and Austrian grenadiers were pouring volleys into each other. A battalion of Bulkley's regiment had already been forced to retreat. |
 |
Paul kept the Spanish moving slowly forwards in the face of massed Austrian cavalry.
|
 |
| The Austrians began to move their cavalry through the Grenzers. |
 |
A wider angle shot of the previous photo.
|
 |
Shaun put five of his regiments into line with one in support. I think we all know what's coming next.....
|
 |
I seem to have missed a photo opportunity as prior to the action shown in the above picture, the Austrians had successfully beaten off an attack by a battalion of French Guard. Shaun then charged the French line, weaker now the the Guard were out of the way. Another regiment of Austrian cuirassiers also charged the Spanish Irish (Ultona I think) battalion. Both units survived the closing fire and charged home but both lost heavily in the melee that followed and routed. The French battalion also routed. Pretty conclusive outcome I reckon.
|
 |
Alt-Modena Cuirassiers in flight.
|
 |
More Austrian cuirassiers routing after their failed attempt to break the Spanish line.
|
 |
The routing German regiment put another hit on the Royal Italians as they broke through them but thankfully dispersed before they could do the same to the French Guard who can be seen rallying at the rear.
|
 |
| The Waldensian brigade wheeled round to face the French attacking in the centre, fully expecting the enemy cavalry to come thundering towards them. They were to be disappointed as the French horse held back for a more opportune moment. |
 |
The table seen from the eastern end.
|
 |
Neil’s Waldensian commander was classed as ‘dashing’ so when he threw a six to activate the brigade they got two moves. As they were close enough (or too close) they were forced to charge Rooth’s Irish regiment. Conrad also ordered his grenadiers to attack. In the ensuing melee the Waldensian battalion was broken while Rooth was forced to retreat.
|
 |
Mark then ordered his French horse to attack the Waldensian line. They survived some desultory closing fire but were hit in the flank by the single regiment of Waldensian horse and forced to retreat.
|
 |
| The Austrian batteries guarding the bridge and pass. |
 |
The French horse hit in the flank by the Waldensian horse.
|
 |
Back on the other flank, Shaun launched another attack with his cavalry. The targets were the Swiss Dunant regiment in Spanish service and the Spanish artillery. Losses due to closing fire were heavy but both units were swept away.
|
 |
The Austrians Dragoons swept on into fresh Spanish horse and were thrown back.
That pretty much concluded the game. The Waldensians were beginning to crumble and the Austrian infantry were all recovering with heavy losses. Only the Austrian grenadiers, their artillery by the bridge and what remained of their cavalry were in a condition to continue to battle. On the other side the Spanish infantry were in danger of being ridden down by the remaining Austrian cavalry and the French infantry, although bruised, was still in the battle, just. The French cavalry were battered but there were still four regiments in play, as were both Spanish regiments. As were approaching 4pm in the UK and 2.45 am in Adelaide I called it a day, and declared the result to be a somewhat bloody draw.
It was great to get my 18thC stuff on the table again, and I hope to run another 18thC game next week, again using Honours of War. Everyone enjoyed the game so mission accomplished. The technology also worked very well with no streaming issues from my end. However, next time I shall have to rope in a volunteer to help move the figures etc as hobbling backwards and forwards around the table dealing with alternate brigades has really buggered up my back. This wasn't an issue using BP or P&S or even GdA as each side is dealt with in turn. As we are in total lockdown again wef Wednesday I have already enlisted the help of my wife or daughter to help.
The Waldensians weren't simply plucked from my imagination, although they never did rise to statehood in northern Italy. They were and are a real religious group, more of which can be read here.
Until next time.
The wargaming part of the day concluded with another meeting of the Virtual Wargames Group, which as always was a relaxing way to wind down after a physically and mentally exhausting but much enjoyed and needed day of wargaming.
|


A cracking game and nice to see Honours of War worked so well. They are my go to rules for the 18thC and I've yet to have a bad game with them.
ReplyDeleteA super looking game, but where do you find the energy?
ReplyDeleteThanks David. It’s physically knackering but I need the interaction and mental stimulation.
DeleteI can't even bring myself to go into GHQ it depresses me do much.
DeleteExcellent Colin. Quite inspiring.
ReplyDeleteA great looking and intense game. Some lovely photos and a really enjoyable report.
ReplyDeleteReading your account and looking at your photos lead me to muse: are remote games the ultimate solo wargaming experience?
1. You move units in response to commands from two 'AI' players.
2. One person moves units and rolls dice, so only one source of interpretation (also of 'luck'!)—I do note the negative of 'wargamer's back' though.
3. Photos are clear and uncluttered. There are none of those, always a bit strange, 'wargamer's crouch' photos!
4. Fewer chances of figures ending up on the jumper sleeve or belly area and hitting the deck.
5. If required/preferred, a game can be left set up and played out over several sessions.
Regards, James
Thanks James, glad you like it.
DeleteInteresting point you raise re the ultimate solo game. It could be but it isn’t as there’s been up to eight playing, usually four or five. I let the players throw the dice and just trust them not to cheat. It becomes obvious if someone’s doing that. We still get lots of banter and sledging from the players of course. All I do is facilitate the game and move troops, measure ranges and adjudicate the rules. The players can switch between camera views as they see fit but being distant there is an interesting fog of war element. I have left games up from one week to the next, occasionally longer. Far less clutter and any damage is either my fault or one of the cats!
Splendid stuff Colin...
ReplyDeleteA very enjoyable report...
All the best. Aly