Friday 29 September 2023

Some Swedish Artillery 1808

I just finished these today (Friday, but it might be Saturday before I load this post). A battery of very light amusettes which I think look quite the part. The gunners are from Ian of Eagle Figures the other side of town and the cannon are 3D resin prints off a German guy on Etsy. They’re a bit fragile but really well detailed. Handle with care please.


As usual my painting is degenerating into the slap it on approach. The blue is a ‘speed paint’ while the other colours are Vallejo ‘not so speedy but quite fast still’ paint. Mmmmm?


Big game tomorrow. More of which later.

Friday Roundup and some 1866 bits ‘n’ bobs.

I’m continuing to make progress through the half finished stuff on my desk as well as working on more Russian and Swedish units for my Russian invasion of Finland in 1808. But first here’s another battalion of Austrians for my 1866 army, followed by some Prussian jäger on skirmish bases for both 1866 and 1870/71. Both are a bit of a rushed job just to get them off to barracks.

I’ve had these on the desk for maybe a year or more. I now have three and a half brigades of Austrians; 21 battalions of line and four of jager, together with their artillery, making a full corps, or they will when I finish the last three infantry battalions sitting in the lead mountain. 

My Prussian jäger battalion is based in close order so when I saw these then unpainted figures going for pennies (it’s relative to their price new) on eBay I needed no encouragement to buy them. 

I’ve started having a serious (?) clear out and a few things are trickling onto eBay to replenish the funds. It’s amazing what gets unearthed from the box of doom in the Burrow or down the garden in the greenhouse of forgetfulness. I found those other three battalions of 1866 Austrian infantry referred to above for heaven’s sake! Well at least I will now be able to field a complete Austrian corps of four brigades, each of a battalion of jäger and six of line infantry (two regiments), plus all the necessary artillery and cavalry. On artillery, I’ve just about completed the doubling up of the Austrian batteries, giving them each two models (some actually have a limber, others an abandoned gun) and a wider more accurate frontage. I just need to do the same with the Prussians now, then the French. 
 

Tuesday 26 September 2023

Another Russian Napoleonic Battalion


I’ve finished another unit for my Napoleonic Russians, a battalion of the Velikij-Lukiska Musketeer Regiment. I’ve already completed their grenadiers, and am well on towards finishing the next battalion of the regiment this week.

As before these are old Casting Room Miniatures, the flags being from the excellent Maverick Models Here.

Once this regiment is done and I get my finger out and paint a dragoon regiment (perhaps the thought of 30 figures is the reason?) I’ll be able to pit them against my little Swedish army for their baptism of fire. 

As usual these photos make all the mistakes very visible but at the moment this is the best I can manage. They’ll look impressive en masse though I am certain.

If anyone has the definitive organisation of a Russian regiment for the period 1807 to 1808 I’d be very pleased to hear from you. I’ve read so much conflicting information my brain has gone 😡. Follower Carlo has offered some advice so at the moment I’m organising a regiment as three battalions, each of 24 musketeers and eight grenadiers, which is also how Pete at Elite Miniatures has his shown in the photo gallery on his webstore.


I’ve  got quite a few other bits almost ready to go off to barracks that’s been lying (cluttering) my painting desk for months; mainly Austro Prussian and Franco Prussian War units, of which more anon. (They are the perfect displacement activity to avoid painting Russian cavalry).

Monday 25 September 2023

The Destruction of the Imperial Army vol 1 - A superb addition to the collection.

This is one of those books that makes a very loud thump as it hits the doormat. At just short of 540 pages it is big. I am prone to devour anything and everything that hits my radar relating to Bismarck’s wars, in particular the Franco-German War, so I was very keen to get my head into this new publication from Helion in their ‘from Musket to Maxim’ series. ‘The Destruction of the Imperial Army, Volume 1: The Opening Engagements of the Franco-German War 1870-1871’by Grenville Bird is an absolute gem.

This volume covers the first two weeks of the war, up to 12 August 1870, in an amazing level of detail. In addition to the normal German sources which have been referenced many times before, the author has used a vast amount of previously unused material written from the French perspective, La Guerre de 1870-1871, published by the French General Staff’s Section historique around the turn of the 20th Century, together with many other official and semi-official Staff studies. Much of the detail in this book derives from these aforementioned sources, and more, many of which had previously never been translated into English.

As I mentioned earlier this volume covers a little under the first two weeks of the war, but begins with chapters on the causes of the war, on the Imperial French and German armies, and the French and German plans and mobilisation. I am familiar with the clockwork-like nature of the German mobilisation and equally with the less than effective French mobilisation, but found there was still a great deal more written in these pages that was new to me.

What then follows are absorbing chapters covering the battles of Saarbrucken, Wissembourg, Froschweiller and Forbach, followed by the French retreat and German advance on the Moselle.

There are a 16 very detailed colour maps showing the topography and the troops involved, which are very handy when following the strategic and tactical movements of the armies. There also lots of colour and black and white illustrations. In quite a few cases we are presented with an image of an aspect of a particular battle as it was in 1870 alongside a present day photograph of the same location which I always find interesting and very useful. I’d not come across quite a number of these illustrations before so this was an added bonus. The book is also well provided for in extracts from the memoirs of many participants, which always fascinate me, as not only do these passages contextualise much of the narrative but also humanise it.

The appendices, all 17 of them, provide detailed orders of battle for both the French and German armies at the start of the campaign and then for each of the battles covered in this volume. There are also casualty returns which illustrate the ferocity of the fighting and the disparity in losses received.

So, a fantastic book, one that has been painstakingly researched; and don’t forget this is the first of FOUR volumes on the subject! To say I am looking forward to the next one is an understatement.

Now I really must get some more FPW figures from the boxes of doom into production. 


Saturday 23 September 2023

This week’s stuff

I took delivery of a regiment of uhlans for my early Russian Napoleonic army this week. To the best of my knowledge no uhlan regiments served in Finland against the Swedes but they will of course be very useful as and when I use the army to fight the French during the 1807-1808 Polish campaign. These are old Casting Room Miniatures acquired during one of their  Christmas sales that I’ve used over the last three years to build up the Russian army; 25 percent off makes a big difference to the list price (yes, a quarter off, I can do the maths) when buying in bulk. The minis were painted for me by my mate Rob at Northumbrian Painting Services and very nice they are too.


All I’ve done is base them and bung a couple of flags on.

Next up will be another regiment of Russian cavalry in the shape of some dragoons.

Wednesday 20 September 2023

The Tagus Campaign of 1809


The Tagus Campaign of 1809, an Alliance in Jeopardy’ by John Marsden is No. 109 in Helion’s excellent often (in a very good way) eclectic ‘from Reason to Revolution’ series. I was not especially knowledgeable about this campaign, beyond the actual battles and the fact that my wife’s great, great, and so forth grandfather was at the time a physician under Beresford (not a mere surgeon!) in the Anglo-Portuguese army. I was hoping that it would broaden my understanding of the Peninsular Campaign in general so was looking forward to learning more, which indeed I did.

The starting point for this book is the invasion of Portugal by the French in 1808 and the subsequent British landing in Lisbon in April 1809. Led by Wellesley, the British liberated Portugal and then marched to link up with the Spanish army of de La Cuesta . Much of the book focuses on the involvement of the Spanish army and contribution by this rather unpopular character, but it is easy to come to the conclusion that he was a major player in the Anglo-Spanish campaign and deserves more recognition than he normally gets.

The book leads us through the early months of the campaign, the Spanish defeat at Medellin, and to the battle of Talavera and beyond. It is full of contemporary correspondence and similar, which for me at any rate bring these accounts to life; that on page 59 relating to a conversation between Spanish PoW and their French guard is amusing and adds a little bit of humanity to the otherwise disastrous and costly outcome at Medellin.

Chapter 13 is also worthy of note as it unwraps many of the issues affecting the campaign, including transport and provisions, Austria’s failure on the Danube and issues relating to Wellesley and Beresford perceived strategic errors.

The book contains 27 black and white, maps or diagrams, to accompany and compliment the text. Each depicts a significant moment in the campaign so for those like me whoseonly exposure to Portuguese and Western Spanish geography is based on holidays many years ago is quite handy.

There is a single appendix which contains interesting extracts from two letters from Wellesley, both dated 24 July 1809.

This is a well written and clearly well researched volume, and I can recommend this book highly, not only as it has increased my knowledge of this campaign, but because it presents a refreshing perspective that sheds new light on the Spanish participation in the 1809 campaigns in general, and the role of Captain-General Gregorio Cuesta in particular. I am sure readers with a deeper appreciation of the campaign will also find this book worthy of a place on their bookshelves.


ISBN 978-1-804511-90-9     Soft back, 251 pages

Tuesday 19 September 2023

More for Bismarck’s Wars

 A couple of random items were finished today. I seem to have quite a few odd and ends for the War of 1866 and the Franco-Prussian War littering the painting desk so more may well emerge over the next few weeks.

First up is a little FPW scene with a French officer politely asking two Prussian officers the way to the POW camp. The Prussians are Perrys and the Frenchman is actually from Tiger miniatures’ Balkan Wars range.

Another unit to add to my Prussian 2nd Reserve Corps for the Campaign on the River Main in 1866. These are the Hamburg Dragoons. Of course they never saw any action to my knowledge but are quite resplendent in their green uniforms. These are old Foundry figures painted for me by mate Barry. I just based them and found a suitable flag.

Like my other odd 1866 units these will perhaps be best used in a sort of fictional Schleswig-Holstein or Ruritanian-type campaign I have buzzing around in my head. 

Monday 18 September 2023

The Battle of Mudkiwalla, a fictional Sikh Wars battle using General d’Armee

I say fictional in the title but the scenario is a nightmare one for the British, as it is loosely based on Mudki and Chillianwalla, both of which featured annoying jungle. 

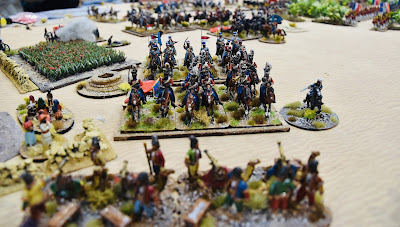
The British under Gough are preparing to make camp for the evening when they are surprised by the Sikhs lurking in positions behind the low lying jungly bits so were hard to see in terms of numbers although the Sikh artillery on a commanding rise was visible and had a reasonably effective field of fire.

The Sikh army is under the joint command of Lal Singh and Taj Singh. BOTH have different objectives. Lal Singh’s army is deployed on the table. Tej Singh and his men will arrive at some point. They never  did.

Paul, Dave and Richard played the Sikhs, while John the Red, Shaun, Jim and Neil were the British. Neil also helped run the game at his end of the table while I did the same from my end. Nearly 14 feet is a long way.

I had told the Sikhs that one of them would secretly be harbouring treacherous thoughts and his aim was to loose, but as covertly as possible to avoid being murdered by his troops. (By this I mean that their actions, by omission or commission would be judged by me. Seemed fair……’ish). They were each given a card, thinking that whoever drew the one marked ‘treachery’ would play this role and keep it secret from the others. What they didn’t know was that they ALL had treachery written on them! (Evil laughter).

Both sides were told they could expect reinforcements and to cement this lie I had the figures laid out on the back shelves ready to use when the time came, which it never did of course.

So here we go for another gloriously colourful and what was hopefully enjoyable game. I enjoyed it immensely as these armies are perhaps my favourites, or at least equal favourite with my 1672 collection.

The Lion of the Punjab before the battle. Ok, my cat Tabitha the Destroyer aka Catzilla before being removed from the table and banned from the Burrow for the day.

The British (on the right) survey the field of battle.

The Sikhs had deployed all their cavalry on the left, leaving the right held by regular and irregular infantry and a large battery of 18-per guns.

The battlefield. Note the refused left flank on the British side.

The incredibly annoying jungly bits. There were penalties for moving through it, which were randomly decided each time a unit wished to enter or move through the jungle. These ranged from halting, diverting left or right, finding a clearing and moving a full move and so forth.

Sikh irregulars moved through the village on their extreme right.

Paul advanced his regulars towards the jungle, supported by more irregular battalions.

Entrenched Sikh cannon in their centre. It was really just an excuse to put my big redoubt on the table. Sadly for the Sikhs the artillery ended up being ‘hesitant’ more often than they weren’t, which meant their firing was not as effective as it might have been.

Jim commanded the British left. His lone cavalry brigade spent much of the game dodging fire from Paul’s battery of heavy guns facing them.

On the other flank the British had formed a grand battery of sorts with the objective of discouraging the hoards of Sikh cavalry from advancing.

Sikhs of the Francese  Compo, their best infantry, advancing towards the jungle.

Jim’s much outnumbered command on the British left begins its advance.

Jim’s infantry advancing with a plum, er I mean aplomb. He was trying to get into the comparative safety of the jungle as his battalions were taking fire from the Sikh heavy artillery on the hill.

The British right, facing a growing number of Sikh Gorchara horsemen. The latter were hit heavily by the British artillery. One of the two Gorcharra ‘brigades’ faltered but survived the test.

These zambureks were to prove to be the bane of the British cavalry. Time and time again Richard threw ridiculously high whenever they fired, with deadly results for more than one British cavalry regiment. They were worthy winners of the Man of the Match Award.

Waiting for us dinners!

Shaun advanced through the jungle with two brigades of infantry. Moving through it resulted in the battalions becoming separated and unformed. In one case the 2nd Bengal European Light Infantry found a clearing so had to move at full speed so they lost touch with the rest of the brigade. They were charged by the Sikh regular infantry and Akhalis and had they not been European would have been routed and dispersed. I have a house rule that allows European troops to avoid such a fate once in the game, so they retreated a full move instead, with heavy casualties. As it turned out, it was a touch of out of the frying pan into the fire, as they were hit hard by the Sikh heavy guns as they emerged from the jungle and this time they were dispersed. 

The battle for the jungle in full swing. It proved hard going for the British, who struggled to avoid becoming hesitant due to a poorly timed lack of ADCs, and to maintain a coordinated line. 

Richard was awarded a nice gong in recognition of his heroic zambureks and the performance of his horsemen who stopped any breakthrough by the British cavalry on that flank.

Gorchara and Bengal Irregular Cavalry, supported by Bengal Light Cavalry,  hard at on the Sikh left. 

Redcoats in the jungle…ah yes. I didn’t say that one of the consequences of moving through the jungle was the chance of a ‘blue-on-blue’ accident! It happened a couple of times much to my amusement.

Heroic Bengal Horse Artillery, one five troops in action.

Richard’s heroic zambureks. They halted a charge from HM 3rd Light Dragoons and played merry hell with several other cavalry regiments.

Over on the British left, Jim’s cavalry were edging forward onto the flank of Paul’s advancing Khalsa, ready to charge, which is just what the BengalLight Cavalry did.

The BLC rode down the Sikhs they’d hit in the flank before they could form square, or triangle as was the habit of the Sikhs, certainly at Aliwal. Despite being fired on as thy rode past the Sikh infantry, they hit another Sikh unit, forcing it to retreat, and were poised to ride on towards another.

Jim’s infantry brigade made it into the relative safety of the jungle and advanced on the Sikhs. In a furious exchange of musketry then a spirited bayonet charge the two leading battalions (both Queen’s regiments) destroyed their opponents and caused the enemy to falter.

Destiny was not on the side of this British commander who was hit by a shell and killed. He was the leader of one of the two brigades slugging it out at Shaun’s end of the jungle which was not helpful to say the least!

Paul’s heavy artillery battery on the Sikh right.

The cavalry melee on the Sikh left went on and on as more units were thrown into the scrummage.

The Governor General’s Boddyguard followed by the 4th Bengal Native Cavalry (Lsncers)


The Sikh right showing the large hole punched into their line by the British cavalry and the attack by Jim’s infantry through the jungle.


Yours truly surveying the battlefield.

To all intents and purposes the game was over as the Sikh army had lost half of its brigades faltering or dispersed. 

These photos are out of sequence but have been left in just to help show the course of the game.


Those damned zambureks again! This time they caused the Governor General's Bodyguard to retire.


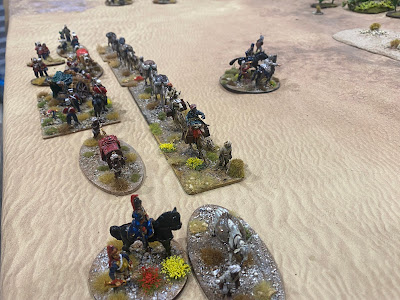
Some of the British baggage train.

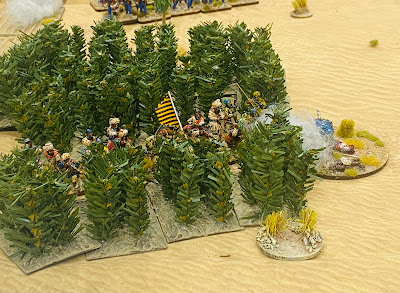
These Sikh irregular infantry managed to hide in the sugar cane field for the entire game.

So, it was a cracker of a game and the amendments to General d’Armee worked really well. I know that more than one of the guys was not a fan of the rules but most were familiar with the mechanics having played many Pickets Charge games at the Durham club over recent weeks. I think the balance is just about right now. The Sikhs can win, but probably won’t, although they will inflect heavy losses on the British which could tip the balance their way given time. I thought the jungle rules also added fun, for me at least, as the British were quite timid when it came to pushing through the jungle. It was open enough for cavalry and artillery to pass through with care and a fair wind but caution probably well deserved, ruled on the day.

I’ve recently had sight of Andy Copestake’s forthcoming Wargaming Guide to the Sikh Wars, which together with my recent trips to India fuelled my enthusiasm to get these chaps on the table. Next time we shall shift up or down in periods but not sure which way yet.

Here are the orders of battle should anyone be interested.

BRITISH ARMY OF THE NOSOSUTLEJ (PART): General Sir Hugh Gough


Cavalry Bde: Lt. Colonel Harriett

3rd Bengal Irregular Cavalry (battle cavalry, veteran)

8th Bengal Light Cavalry (campaign cavalry, line)


Cavalry Bde: Brigadier Gough 

Governor General’s Bodyguard (battle cavalry, line)

5th Bengal Light Cavalry (campaign cavalry, line)


Cavalry Bde: Lt. Colonel White

HM 3rd Light Dragoons (heavy cavalry, elite)

4th Bengal Light Cavalry (Lancers), (campaign cavalry, line)

4th Bengal Irregular Cavalry (battle cavalry, veteran)

Troop BHA (6-pdr horse artillery, elite) 


Artillery: Acting Brigadier Brooke

2 batteries BFA (medium) (9-pdr foot artillery, veteran)

1 battery BFA (heavy howitzers) (12-pdr foot artillery, veteran)

1 battery BFA (rockets) (Rockets, veteran)


1st Division: Maj-Gen Sir Harry Smith


Brigadier Ryan

HM 50th Foot (line infantry, veteran)

33rd & 54th Bengal Native Infantry (BNI) (line infantry, ‘line’)


Brigadier Hicks 

HM 31st Foot (line infantry, veteran)

31st & 345th BNI, (line infantry, ‘line’)

1st Bengal Local Btn (Goorkhas), (line infantry, veteran)

Troop BHA (6-pdr horse artillery, elite) 


2nd Division: Maj-Gen Walter Gilbert 


Brigadier McLaren: 

2nd Bengal European Light Infantry (line infantry, veteran)

16th Bengal Grenadiers (line infantry, ‘line’)

2nd BNI (line infantry, ‘line’)


Brigadier Taylor: 

HM 29th & 80th Foot, (line infantry, veteran)

26th BNI, (line infantry, ‘line’)

Troop BHA (horse artillery, elite) 


Reinforcements......


3rd Division (part): Brigadier Wallace

HM 60th Rifles (light infantry, rifles, veteran)

HM 9th Foot (line infantry, veteran)

5th BNI and 12th BNI (line infantry, ‘line’)


Cavalry Brigade: Colonel McDowell

HM 16th Lancers (heavy cavalry, veteran)

2nd Bengal Irregular Cavalry (battle cavalry, veteran)

9th Bengal Light Cavalry (campaign cavalry, line)

Troop Bengal Horse Artillery (6-pdr horse artillery, elite) 

 KHALSA:

 Commander in Chief: Lal Singh


Artillery:  

2 heavy batteries (cannot move once deployed) (12-pdr, elite*)

1 medium battery (9-pdr, elite*)

(*Not for shooting)


Cavalry #1:

4 Feudal Gorcharra cavalry (campaign cavalry, line)

1 Zambarek camel guns (recruit, class as 3-pdr)


Cavalry #2:

3 Feudal Gorcharra cavalry (campaign cavalry, line)

1 Akhali cavalry (campaign cavalry, veteran)

2 Zambarek camel guns (recruit, class as 3-pdr)


Akali:

4 Akali (‘line infantry’, veteran)


‘Guard’ Infantry Bde:

4 Fauj-i-khas btn (line infantry, elite)


Infantry Bde (Orange):

3 regular btn (line infantry, line)


Infantry Bde (‘irregular’ Faus-i-Ain):

6 ‘irregular’ infantry btn (‘line infantry’, recruit)


KALSA 'REINFORCEMENTS':


Commander: Tej Singh


Cavalry Brigade:

2 cuirassiers (campaign cavalry, line)

2 lancers (campaign cavalry, line)


Infantry Bde (Red): 

3 regular btn (line infantry, line)


Infantry Bde (Black): 

3 regular btn (line infantry, line)

2 medium batteries (9-pdr, elite*)


*Not for shooting


And here are the rule amendments:

Terrain & Other Stuff

Sugar Cane Field:

Impassable to artillery and cavalry.

Infantry half speed and become unformed.

Visibility negligible.

Ploughed Fields and Poppy Field:

Not an obstacle.

Jungly bits:

The entire area covered in the jungly bits is low, scrubby jungle, not thick but dense enough to slow movement and reduce visibility. Artillery and cavalry move at half speed and become unformed. Infantry move at half speed and remain formed.

Visibility in the jungle is 2” unless there a clearing when it increases to 6”.

Artillery on higher ground can shoot anywhere into the jungle, on the long range row, and target classed as under cover.

However:

As it getting dark all troops moving through the jungle run the risk of straying off course. Throw 2D6 and add them up. Test for each unit every turn.

2

Must halt for the full turn. Totally disoriented.

3,4

Continue but wonder off, 1-3 45 degrees right , 4-6 45 degrees left.

5

Clearing. Full move permitted.

6,7,8,9

OK 

10

Clearing. Full move permitted.

11

Friendly fire. Unit spots a body of troops in a clearing and moves to open fire on closest friendly unit in a 180 degree forward arc. Any casualties caused are real.

12

As above but unit takes friendly fire from 1-3 artillery, 4-6 musketry.

Villages:

Would hold one infantry unit should anyone be daft enough to want to garrison them.


General d’Armee - Sikh War Amendments 

ADCs: Sikhs require 4+ to activate an ADC;

Brigade Activation: Sikhs need 4+ otherwise the brigade is hesitant;

No change to initiative test as the Sikhs are already penalised as above.


Sikh Artillery: To reflect the fact that Sikh gunners never ran and always fought their guns to the death if attacked, if a battery is part of an infantry brigade which has to withdraw or disperse, the gunners ignore this and stand by or under  their guns. If a brigade is wholly artillery ignore normal discipline tests and faltering brigade test results. Any result requiring them to retire, retreat or rout (sauve qui peut) is ignored and the gunners stand. In BOTH cases any casualties inflicted as part of the the DT/faltering test are doubled. Essentially the only way to get rid of Sikh guns is to cause enough casualties to force them to disperse/die. None of this applies to Zambureks.


Zambureks can be fired mounted but count as moving and unformed. They are treated as very light guns with a range of 18”;

Deployed zambureks fire as light guns with a range of 18”


European troops part of a brigade failing a Faltering Brigade Test with a sauve qui peut result instead will retreat. European troops also ignore their first sauve qui peut result, retreating instead.


Fear of Sikhs. BNI  and BNC were often quite timid. If charged by Sikhs class them as if they are recruits when working out the charge prior to contact;

Changing Formation. Regular Sikh troops’ manoeuvres were ponderous so all take a full move to carry out, as indeed do irregular units in the unlikely event they wish to change formation.


Akhalis can shoot with their matchlocks (12” range).Treat each base as a skirmish stand, hitting on 5+


Gorchara can also use firearms, even to receive a charge at the halt. If they have to receive a charge at the halt due to a charge test then they may shoot. Treat each base as a skirmish stand, requiring 5+ to hit. They cannot shoot and charge however.


Sikh irregular infantry with matchlocks with a range of 12”. They may not move and fire in the same turn.


Shooting: The difference in the effectiveness of musketry was very apparent as all the Queen’s and HEIC troops were armed with percussion muskets as opposed to flintlocks with which the Sikhs were equipped. To reflect this Sikhs always shoot on the inferior volley table;Troops with percussion muskets/rifles get an extra CD when firing ( which we forgot about).


Sikh irregular infantry, Gorchara and Akhalis may be in a looser formation but are not classed as skirmishers or unformed unless terrain or other outcomes cause it.